
By Train to Battle!

The German invasion of The Netherlands in 1940 was somewhat of a side show and afterthought to the main effort against France and Belgium. In the initial plans, The Netherlands were to be largely ignored, such as they were in the First World War, with perhaps an incursion into the Maastricht region. The Luftwaffe High Command, however, appreciated that The Netherlands could be used by the RAF as an approach route to the Ruhr, and so hasty plans were made to include the conquest of The Netherlands in the overall plan. A very eclectic force was put together including paratroopers and air-landing troops to seize depth objectives, most of the SS troops, a few regular-quality infantry divisions, and 9th Panzer Division to rapidly penetrate and link up with the paratroopers. The whole plan was predicated on shocking the Dutch into a rapid surrender.
To permit rapid penetration, the many waterways in The Netherlands had to be overcome. One of the most formidable was the Maas River, a wide stretch of up to 200m in places. The Dutch used the waterways rather than their border with Germany as their key defences, and 'bouncing' these defences was a key challenge the Germans had to overcome.
The Dutch High Command had studied the First World War and appreciated that defence in depth was a key method to slow an invader. On the axis that the German 9th Panzer Division was to take, the initial warning of an invasion was by border posts telephoning any incursion. The Maas River was the next defensive position, with light screening forces defending the river. The major bridges were wired for demolition and the ferries were also to be sunk. The main defensive line was further west, on this axis along the Peel Canal, a position reinforced with wire and mines.
The German plan was to use commandoes to seize key bridges and then to use trains to drive right through the border posts, cross the Maas and to then crash through the Peel defences before assaulting them from the rear.
This scenario covers the seizing of the ferry at Gennep and two bridges, including the critical rail bridge across the Maas that lead directly to the Peel defences at Mill.


This photo shows the board looking from east to west. The railway line is shown snaking past Gennep and across the Maas. The Germans will enter from this board edge.

The board looking the other way, from west to east. The town of Oeffelt is in the near ground, the Maas River crosses from left to right and then Gennep is beyond.

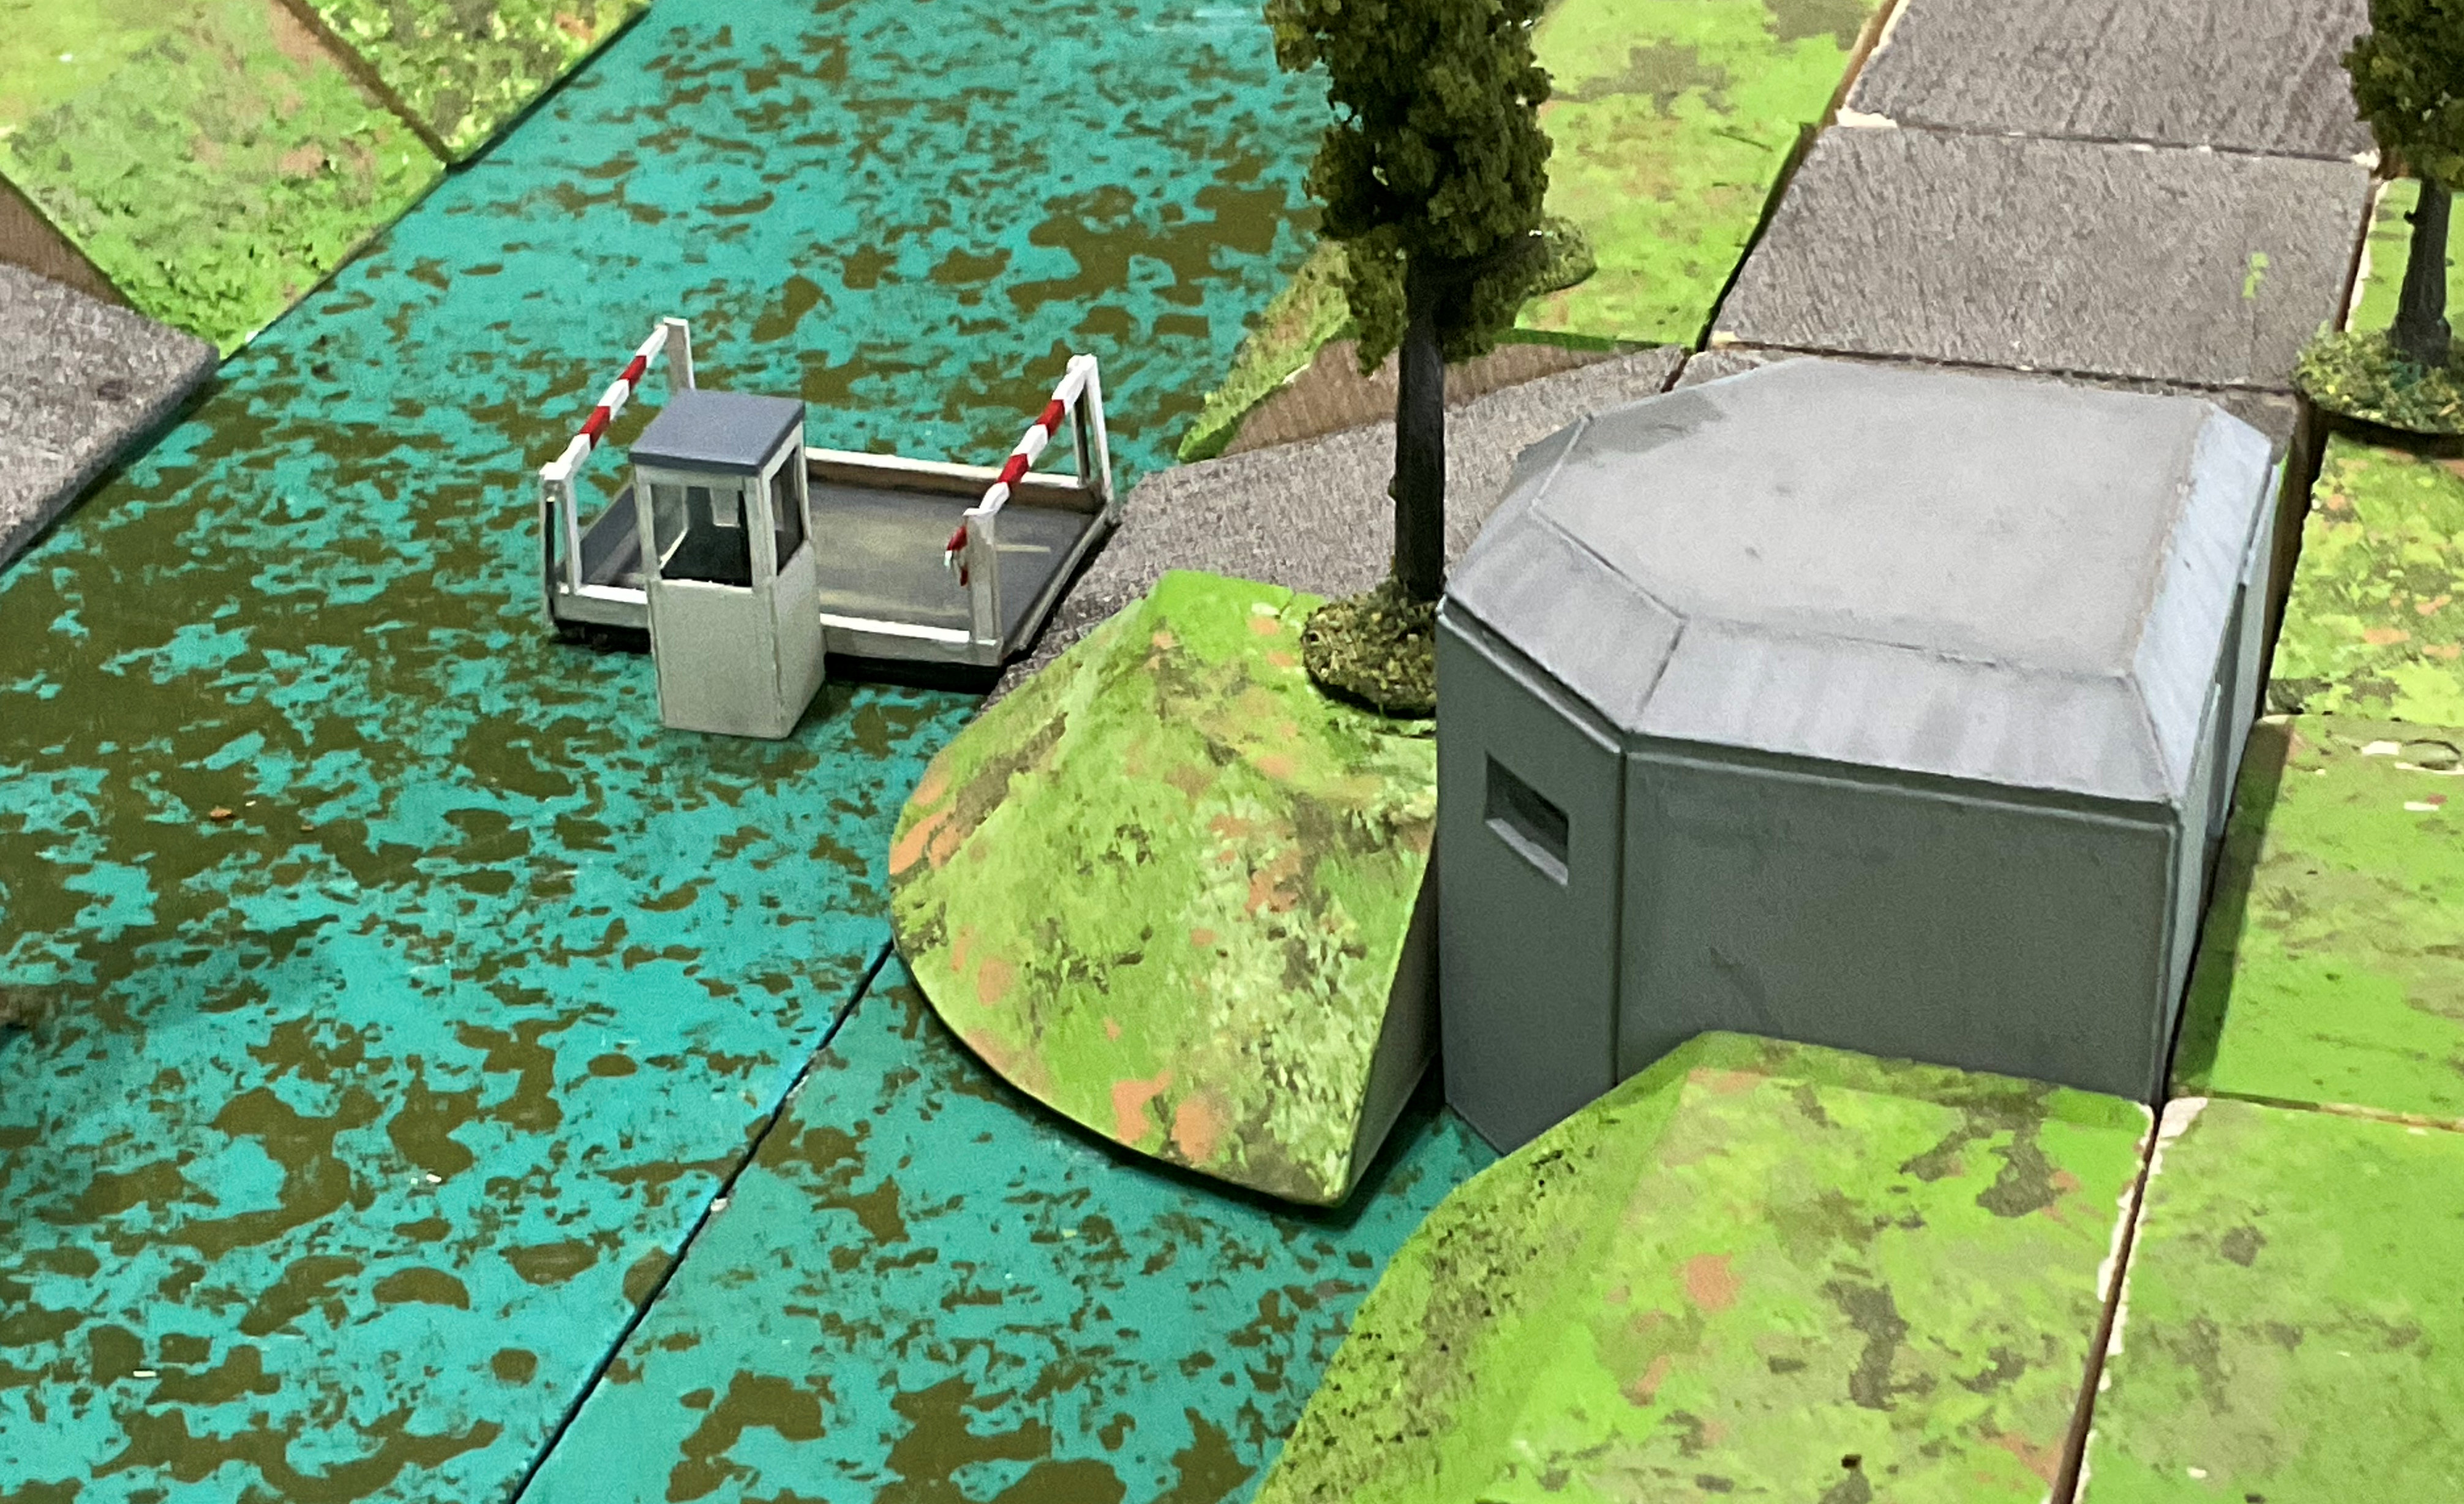
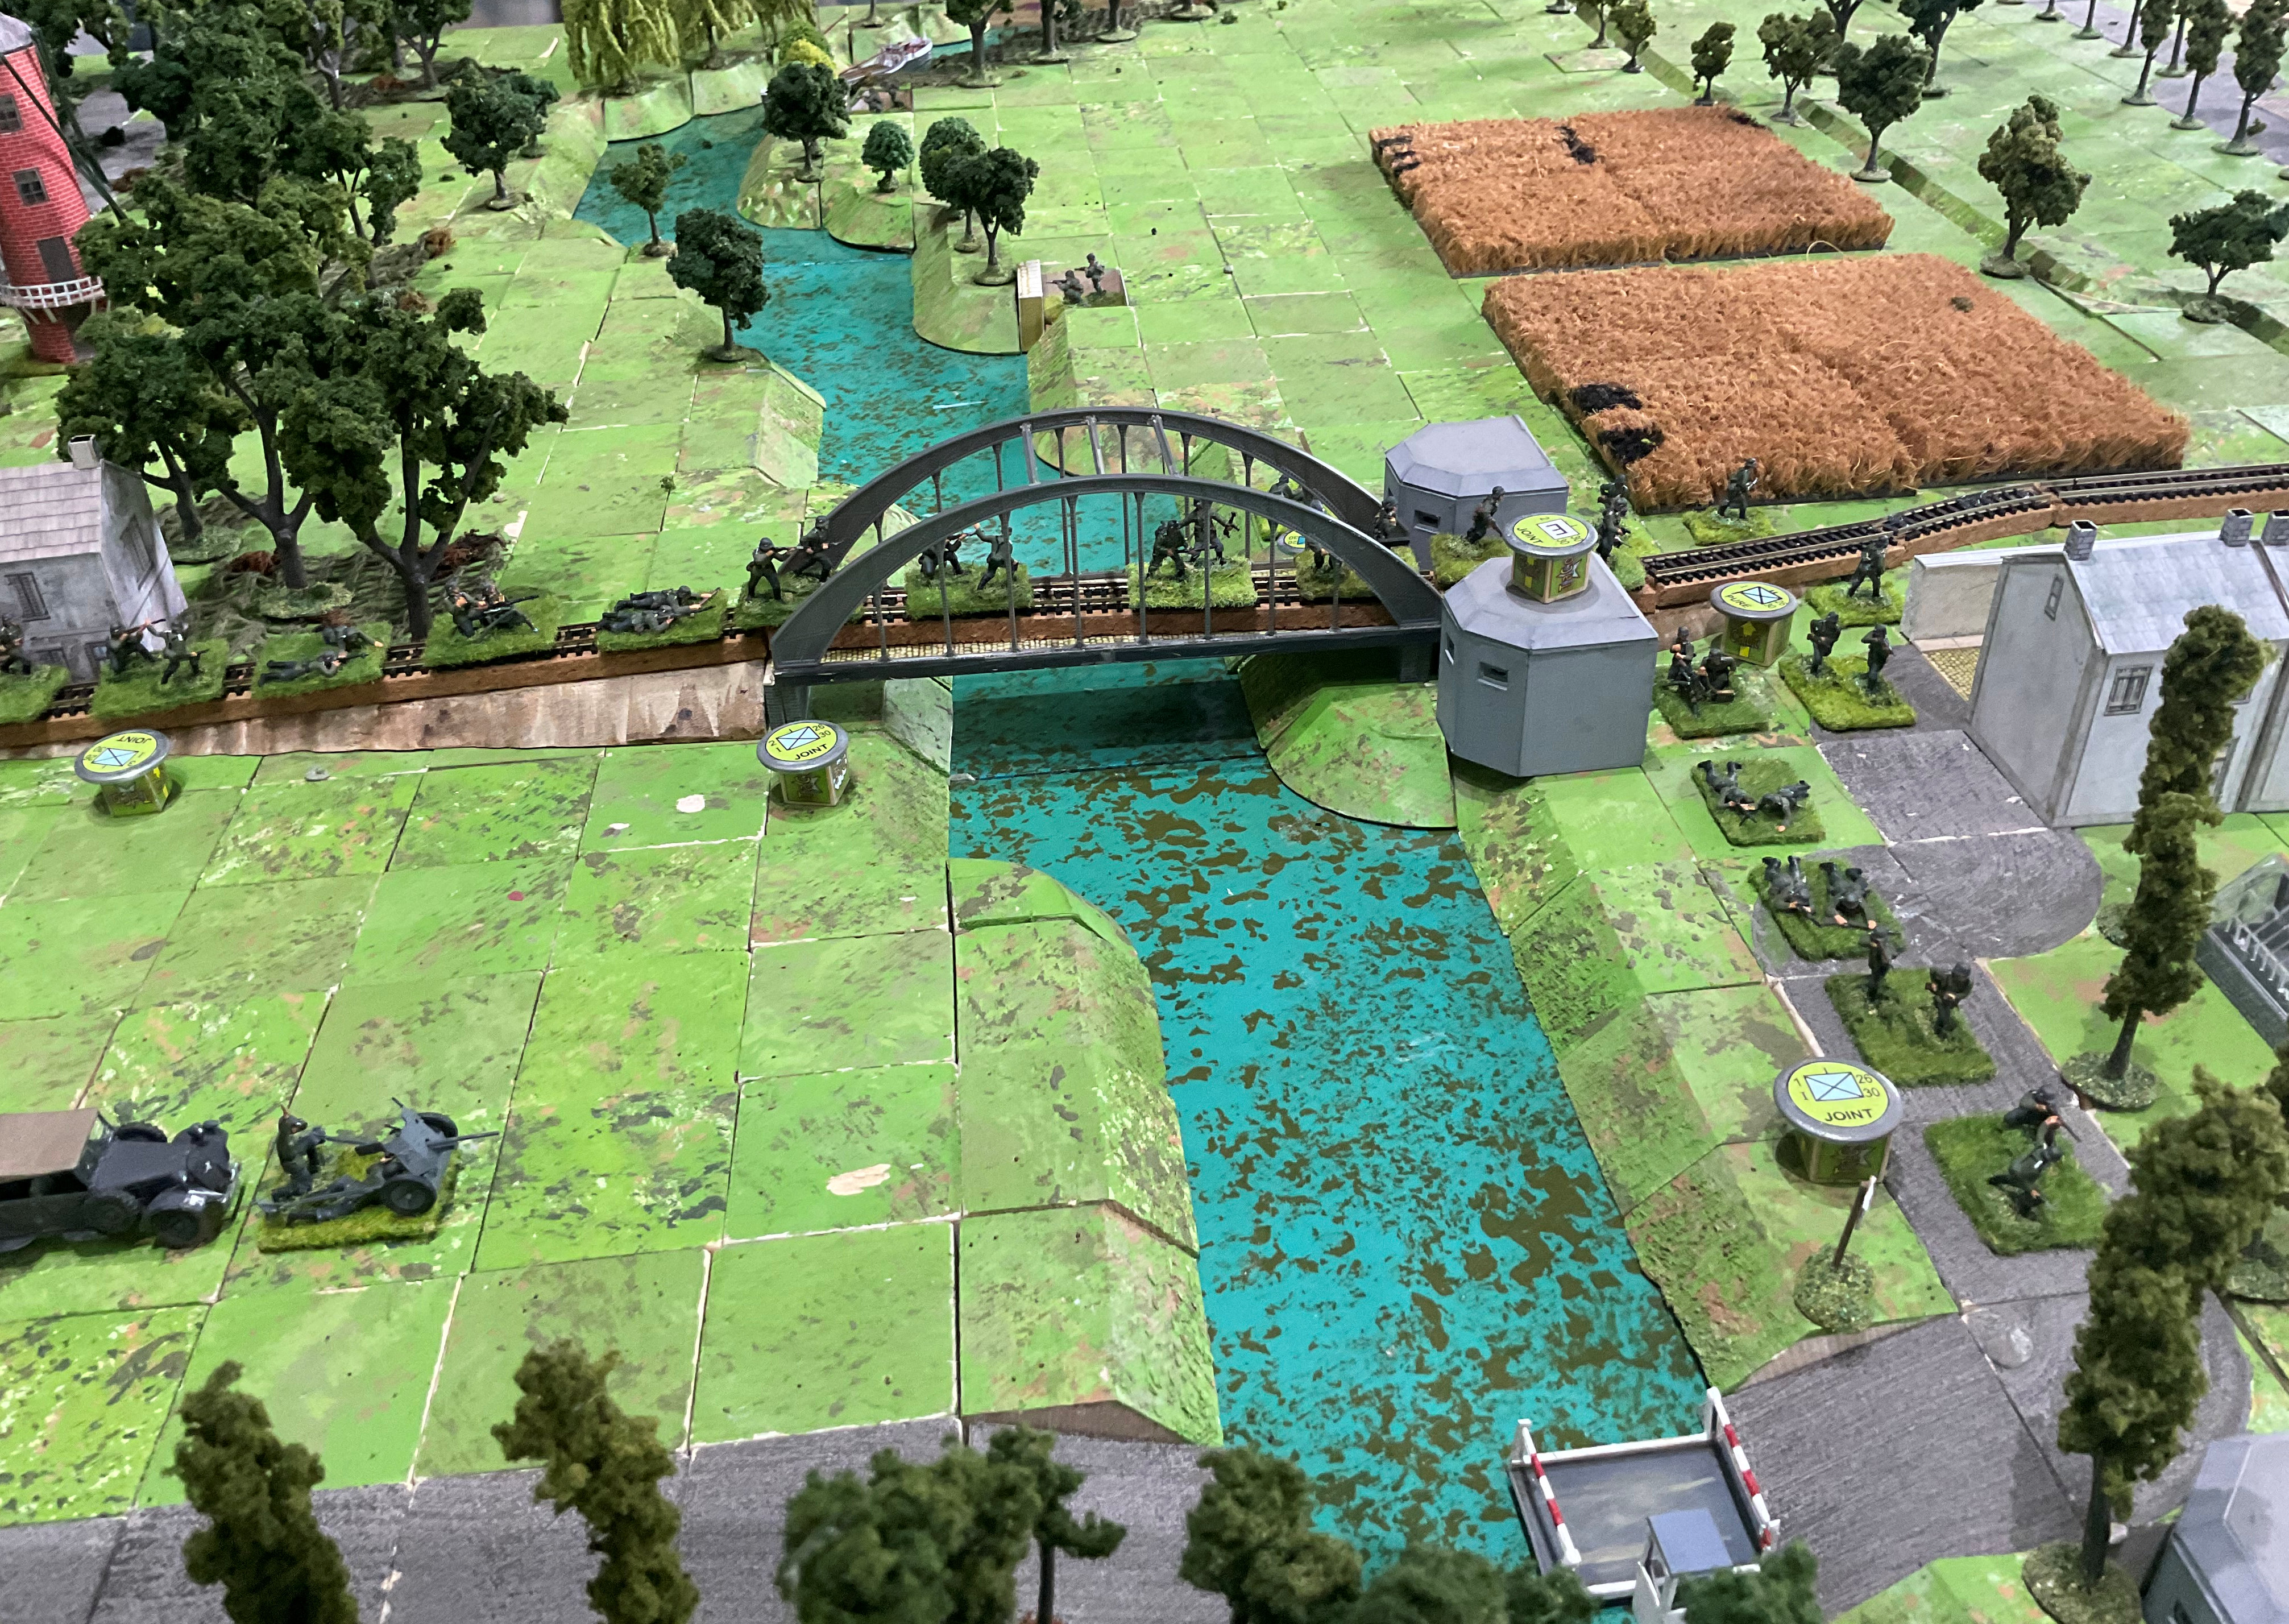
The railway bridge at Gennep and the ferry to the west of Gennep. Just visible is the bridge over the Niers River. The bridges and the ferry are the objectives for the Germans.

The bridges and ferry from the opposite direction looking south.

German commandoes from 4th Company, Baulehrbatallion zur besonder Verwendung 800 Brandenburg Battalion start the game near their objectives. Here the commandoes face off against the Dutch guard at the Niers River bridge. The Dutch guard is a Zvezda Rumanian; the Germans are Caesar.

Oberleutnant Wilhelm Walther approaches the guard ay the railway bridge at Gennep, with some of his men disguised as Dutch troops escorting German 'prisoners'. The Dutch guard is again Zvezda and the German prisoner is Airfix Afrika Korps.

The bridge at Gennep, guarded in the centre by Corporal Van Lier. The commander of the demolition guard is Sergeant Lute, with police in the bunkers on the western end.

A rather fuzzy photo of the third German commando operation, this one by UnterOfficier Gunther Ziesold against the railway station at Gennep.

Supporting the commandoes and the trains will be 1st and 2nd Battalions, 481st Regiment, 256th Infantry Division. They will advance west along the dirt and sealed roads respectively, shown here looking east to west.

A general shot of Gennep and an obligatory windmill.

The game begins. Oberleutnant Walther rolls to successfully take control of the railway bridge.

Unterofficier Ziesold and his team approach the guard at the Gennep railway station. They are fired at without result and close in on the guard for close combat.

The commando team at the Viers River Bridge is not successful in its coup de main and so exchanges shots with the Dutch guard.

The armoured train enters and moves to the Gennep station. The lead units of 1st and 2nd Battalions enter on the roads from the east.

Panzer Zug No. 1 in close up. The 4th (heavy) company of 3rd Battalion is on board.

A standard goods train follows the armoured train. The rest of 3rd Battalion, 481st Regiment is on board. It crosses the advance of 1st Battalion.

Unterofficier Ziesold and his team overcome the guard at the Gennep Railway station as the armoured train approaches.

The commandoes at the Viers Bridge win the firefight and move to secure the bridge.

Turn 2. The armoured train squeezes onto the Gennep bridge and completes the seizure of the bridge.

The armoured train on the bridge, looking south.

The goods train with 3rd Battalion on board reaches Gennep railway station while 1st Battalion advances on the road.

The commandoes secure the Viers River bridge.

1st Battalion advances past Gennep...

while 2nd Battalion advances through Ottersum.

The Germans secure Ottersum.

The rear companies of 1st Battalion on the road to Gennep.

The situation at the end of Turn 2. The goods train is at Gennep station as the two other battalions continue their advance.

The armoured train secures the railway bridge. The Dutch try to sink the ferry but are unsuccessful.

Turn 3. The two trains leave the board and continue on their way to the Peel defences at Mill. One of the companies of the 3rd Battalion is left behind to secure the western end of the railway bridge.

The two infantry battalions following continue to advance, the 1st moving through Gennep while the 2nd turns towards the ferry.

The 1st and 2nd Battalions continue advancing.

Horse-drawn 75mm Infantry Gun moves through Ottersum.
The Dutch once again roll for the ferry to sink it but are not successful. The troops in the covering bunker sense the approach of the Germans. With the two bridges secure, the Germans will now concentrate on the ferry.

Turn 4 and the first troops of 1st Battalion advance up the railway embankment to the bridge over the Maas.

The first troops of 2nd Battalion rush down to the ferry crossing to see what they find. They find a Dutch machine gun in a bunker...

The lead platoon of the German company is eliminated by the MMG in the bunker.

Turn 5, and 2nd Battalion reacts after the rash rush towards the ferry. A company moves into the trees to provide covering fire while the engineers move north to prepare for a rapid crossing. In the background the 1st battalion continues to cross the railway bridge.

The 75mm infantry gun unlimbers and prepares to provide indirect fire. As 481st Regiment is from a Fourth-wave division, it has no 81mm mortars.

1st Battalion continues to cross the railway bridge.

The Dutch commander of the screening force on the river, Lieutenant G. Moubis, moves one of his platoons from their defences towards the ferry site.
The Dutch fire at the engineers across the river without result, but the bunker by the ferry manages to eliminate a German MMG stand.
The first company of 1st Battalion has crossed the bridge and now moves towards the bunker by the ferry being careful to avoid its arc of fire.
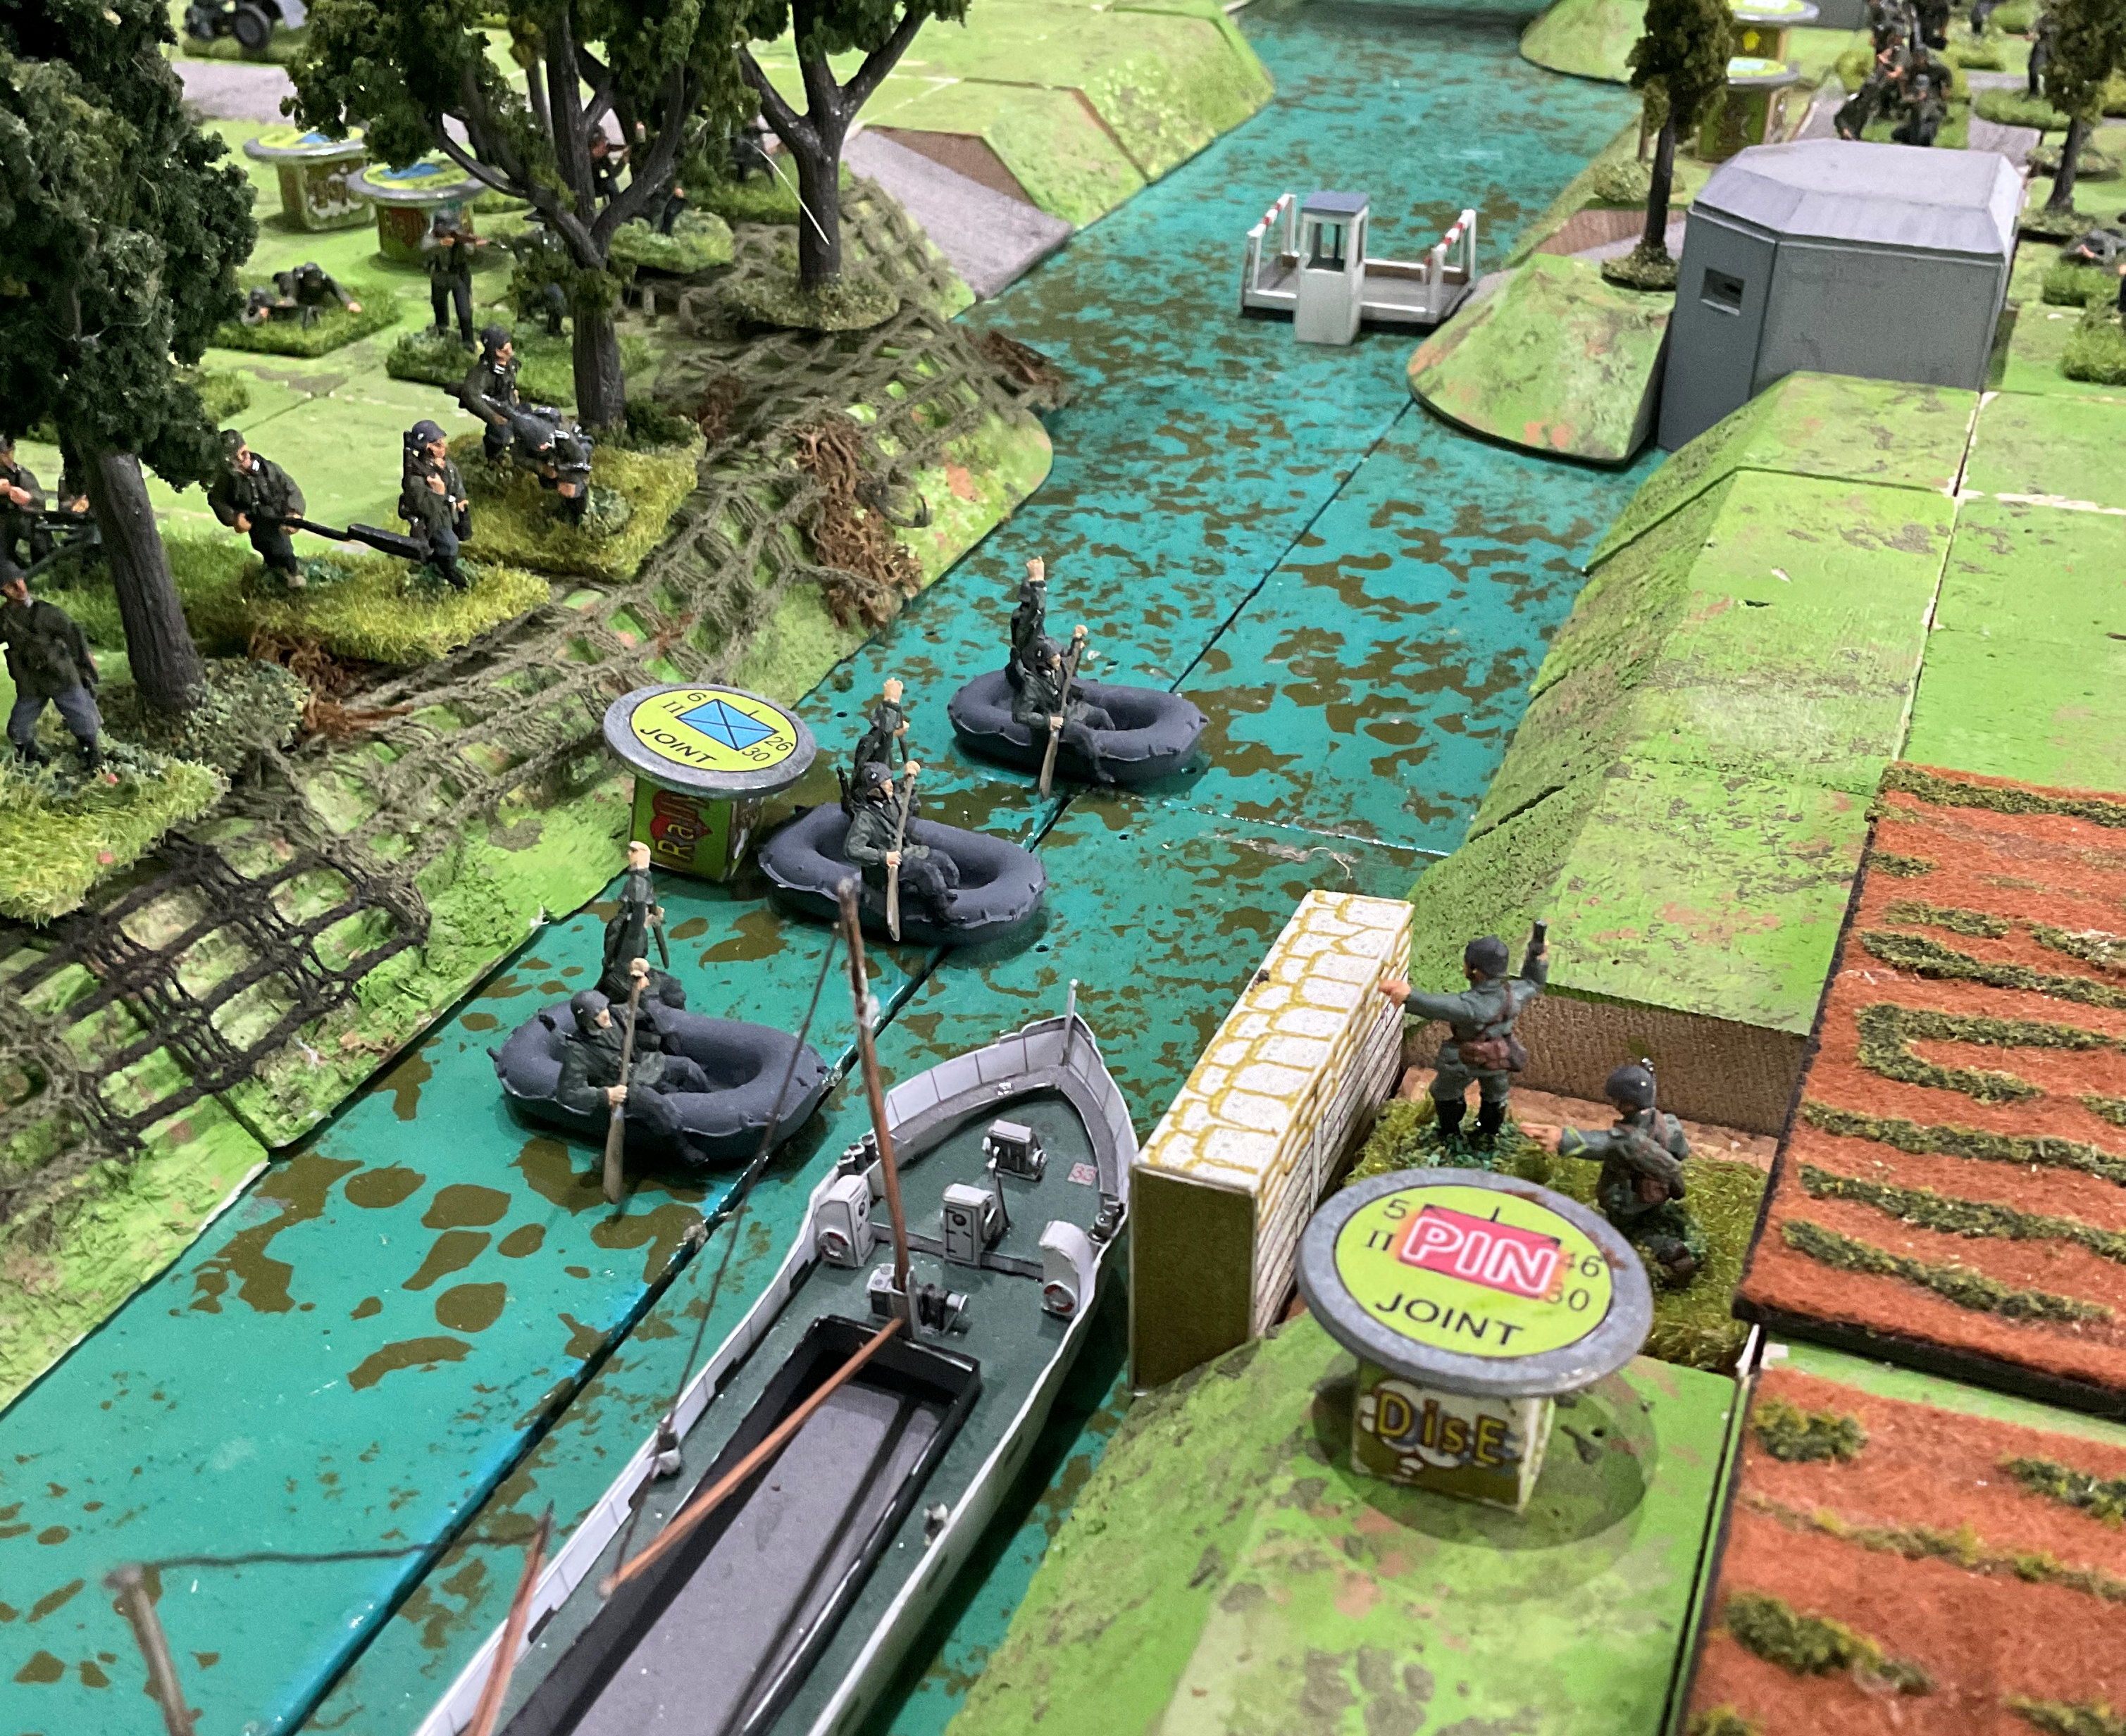
Turn 6. The engineer's fire has pinned the Dutch troops opposite. The first company of infantry crosses the river by small boat.

The 1st Battalion silences the bunker by the ferry. The ferry is still intact, an important advantage for the Germans.

The Dutch have had enough and withdraw shaken.

Turn 7 and the Germans consolidate the area around the ferry.

The game ends with the Germans in possession of the two bridges and the ferry. They lose a company worth of infantry in securing these objectives. The game followed the historical sequence and outcomes very closely, although the Dutch managed to sink the ferry in the actual battle.

I hope you enjoyed my first post. I welcome any thoughts and comments.

If you would like to explore my other scenarios about the German invasion of The Netherlands you might care to go to: Wargame Vault - MGK Military Simulations - The largest wargame download store. You will also find other volumes dealing with battles against the French, BEF and the Belgians, plus some free downloads you might enjoy.
Excellent 👍 will be following this blog with interest
ReplyDeleteThank you very much. Not being an 'influencer' nor a 'celebrity' (thank God) I will add content slowly but surely.
ReplyDeleteFollowed your posts regularly on TMP. Great to see you now have a blog.
ReplyDeleteThanks John. It was the demise of the ToB website that forced an old dog to learn new tricks
DeleteAlways been a fan of your work, and played CD3 for about the last thirty years. Good stuff mate
ReplyDelete